Home → Mobile Listings → Mobile Listings How-To → Adding Photos to Hotline Listings
3.7. Adding Photos to Hotline Listings
Updated 01.14.11
Listing Data Feed users: Any photos uploaded into the MLS will automatically be available through your Mobile Hotline eBrochure and Mobile Web pages if you and/or your broker has established a Listing data feed. Instructions follow for uploading ADDITIONAL photos. If you upload the same photos that are present in the MLS listing, they will be duplicated in your eMessages, eBrochure and Mobile Web Page!
1. From the Real Estate Tools tab, select Your Listings from the sub-menu
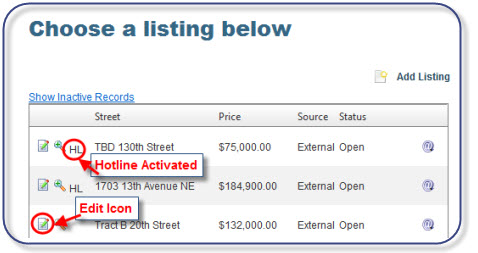
2. Your Listings page will appear. Listings for which Hotlines have been activated are identified by
"HL" to the left of the property address:

3. Click the Edit Icon for the Hotline property to which you wish to add photos. The Listing Detail
page will open
4. Scroll to the Add Photos To Your Listing section. Note that photos already associated with your
listing are also shown in this section. In the Photo Name field, enter a brief name for your photo.
This will appear as the Photo Caption in your Mobile Web page.
5. Enter an optional description in the Photo Description field - this information is for your personal
use only and will not appear in any electronic or printed materials
"HL" to the left of the property address:
3. Click the Edit Icon for the Hotline property to which you wish to add photos. The Listing Detail
page will open
4. Scroll to the Add Photos To Your Listing section. Note that photos already associated with your
listing are also shown in this section. In the Photo Name field, enter a brief name for your photo.
This will appear as the Photo Caption in your Mobile Web page.
5. Enter an optional description in the Photo Description field - this information is for your personal
use only and will not appear in any electronic or printed materials
6. Click the Browse button to browse for the photo(s) you would like to upload.When the Choose File
dialogue box opens, use the Look In dropdown box or the search arrows to browse for your photo
7. To select the image to be uploaded, either double-click the image, or click once on the image
to select it, then click the Open button in the Choose File dialogue box
8. Click the ADD button to add your photo
9. Scroll to the bottom of the Manage Listings page and click the Save Listing button to save your
updates
This page was: Helpful |
Not Helpful
